|
|
|
|
|
second triode, which in turn will be inverted and amplified again by the output tube.
The remaining variable to be determined is how much inverted noise signal is needed to match the noise at the plate with the noise at the power supply connection. The solution is simple enough: the magnitude of noise on the first driver tube plate must equal the gain realized by the output tube's grid, divided by the sum of the second driver tube's gain, minus its own PSRR ratio. Simple, but not easy to achieve in practice. Careful juggling of the first driver tube's cathode resistor and plate resistor values just might work, but it is unlikely since the gain from the second driver tube will probably be too great to get the noise signal to a value the output tube can use.
The Trick
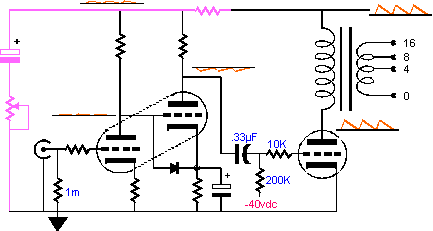
A better approach is to design the best driver stage in terms of linearity and adjust the amount of power supply noise at the driver stage's power supply connection. The circuit shown below allows for fine noise nulling by the use of a potentiometer. The key components are the capacitor, potentiometer and series resistor. At the potentiometer's bottom extreme, its full resistance is realized and the attenu-ation of the power supply noise is minimal. At the other extreme, the attenuation is greatest. The potentiometer's three connections are all at ground potential and no DC current flows through the device, which will serve to make it safer to handle and preserve its life expectancy.
The remaining question is what are the values for the cap-acitor, potentiometer and series resistor. The answer can be derived mathematically, but in practice the values will prob-ably take some fiddling. The first value to set is that of the series resistor. The larger this value, the smaller the needed value of the capacitor. Too large a value and an unacceptably large voltage drop will develop across the series resistor, which will steal potential B+ voltage from the driver stage, as the driver stage's total current consumption
|
|
|
|
|
|
|
|
|
|
corner frequency of below 12 Hz when working into just the series resistor value:
C (in µF) = 159,155 / R / 10
The remaining value that must be decided is that of the potentiometer. Here is where the most fiddling is needed. Ideally, we want the potentiometer to be at its center pos-ition when the noise null occurs as this will give us the most range of control. A good starting point would a potentio-meter resistance value one tenth that of the series resistor. Then if the null occurs at one extreme or the other, the potentiometer value can be moved up or down. We said some fiddling was needed.
One Caveat
This noise cancellation technique, as well as last month's, works best if the power supply noise is composed of primarily a single frequency, say 120 Hz. If the noise contains many higher harmonics, the nulling will prove more difficult as phase shifts within the amplifier will come into play. At lower frequencies the technique will still work. Sometimes the power transformer center-tap is poorly placed and one half of the secondary winding will have a greater voltage than the other, say 375v vs. 370v. This will present no problem if the transformer is used in a full-wave bridge rectifier circuit and the center-tap is left discon-nected, but in a full-wave center-tapped rectifier circuit (the most common tube power supply circuit), the imbalance in voltages will add a 60 Hz noise signal, assuming that the wall frequency is 60 Hz.
In other words, a fairly good power supply is still needed. Chokes are definitely a good idea, as are high speed, soft recovery diodes. The better the power supply, the less work the noise nulling circuit will have to do. Remember, quietness is next to Godliness. How quiet should an amplifier be? How much of the music do you want to hear?
// JRB
|
|
|
|
|
