| John Broskie's Guide to Tube Circuit Analysis & Design |
| 31 August 2014 New High-Voltage Power Supply
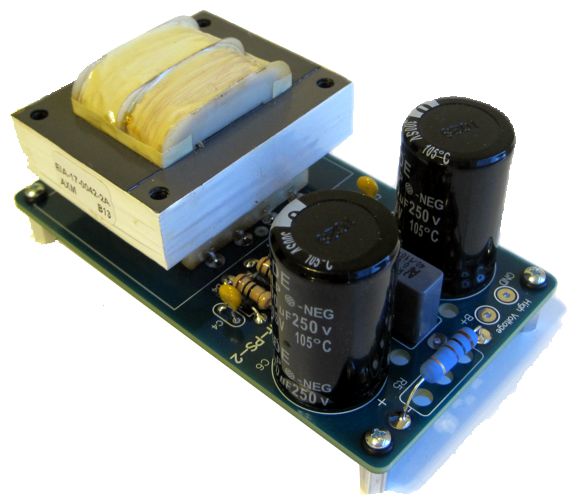
Tr-PS-2: High-Voltage Power Supply
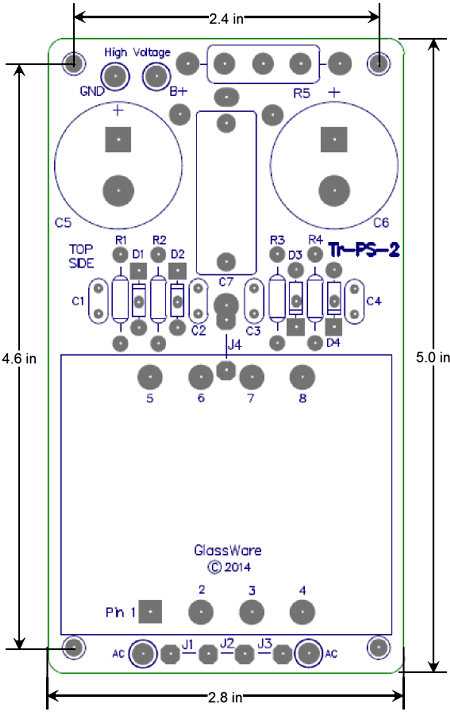
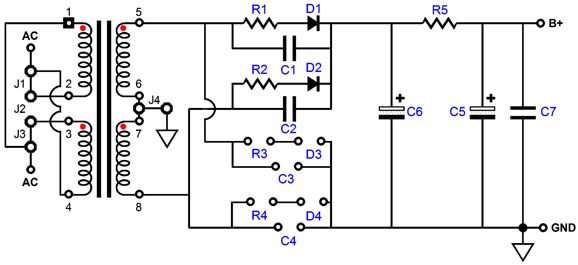
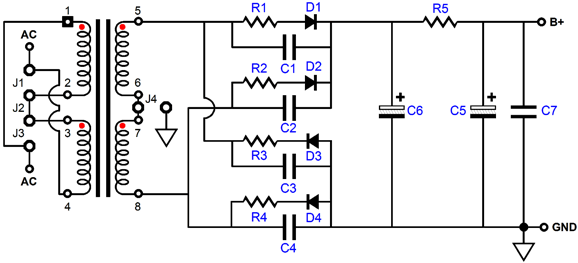
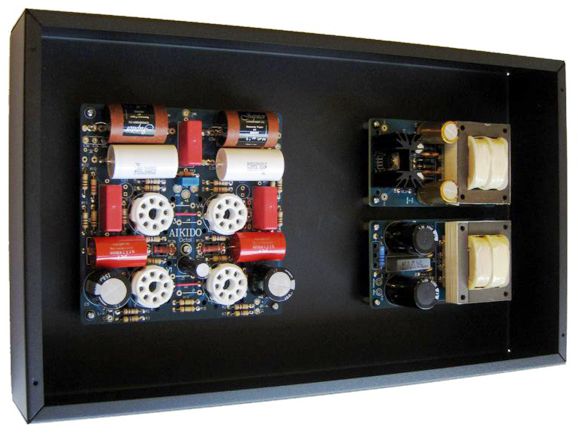
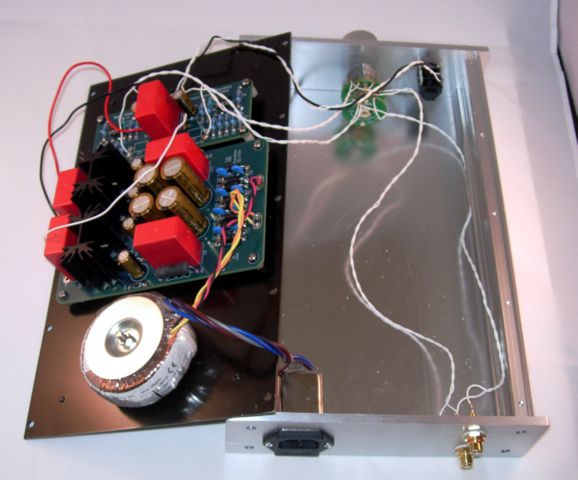
The Tr-PS-2's PCB is only 5 " by 2.8 " and, like all my PCBs, is extra thick (0.094 in), US-made, with heavy 2 oz-copper traces. The PCB holds a simple RC pi-filtered high-voltage power supply. Each rectifier is in series with a 10-ohm resistor, both of which are shunted by a high-voltage capacitor to reduce RFI creation.
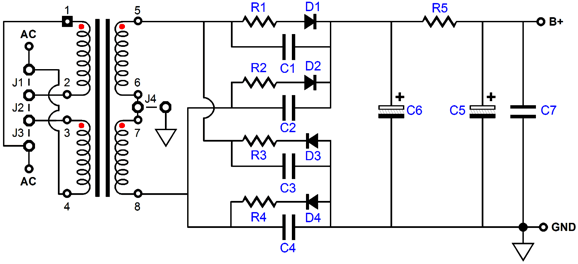
As you can see from the Tr-PS-2's schematic shown above, using jumpers J1 & J3 places the two primary windings in parallel; using only jumper J2, in series.
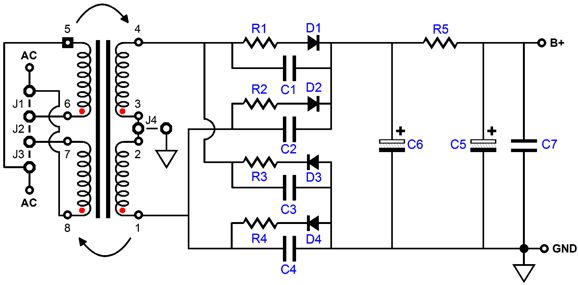
The Tr-PS-2 power supply uses four solid-state, ultra-fast-recovery rectifiers, a simple RC pi-filter to achieve a fairly quiet B+ voltage, which delivers a maximum about 165Vdc @ 150mA or 330V @ 75mA, depending on the option chosen and the wall voltage, as its output voltage is not regulated. If the external load draws 30mA and the 1k RC resistor is used, the output voltage would be either 145Vdc or 300Vdc, depending on the jumper option chosen. The 5W series resistor (300, 1k, 1.5k, 10k supplied) can be replaced by an external choke. When I set out to create the Tr-PS-2 my goal was simply a small power supply that put out 150Vdc and used a PCB-mount power transformer, I found myself using that B+ voltage in many projects, wherein high output current was more important than high voltage, such as tube headphone amplifiers, certain SRPP and Aikido circuits, and BCF balanced to unbalanced converters. But the more I thought about it, I realized that getting twice the voltage, 300Vdc, could readily be had by turning the power transformer around 180 degrees, reversing the primary for the secondary, thereby doubling the AC voltage available to the rectifiers.
Now, the rectifiers see 230Vac, rather than 115Vac, which against 1.414 equals 325Vdc. Where I live, my wall voltage is closer to 122Vac, so 244Vac is presented to the rectifiers, producing 345Vdc. (Actually it is quite a bit hotter than that, as the small transformer's poor regulation develops a higher unloaded AC voltage. Since the kit comes with either 250V or 450V reservoir capacitors, the extra voltage is not a problem.) On the other hand, if I lived in Europe not only would I be eating better pastry, I would see 230Vac to 240Vac coming out of my wall socket, so there would be no need to flip the transformer; instead, using jumpers J1 & J3 would be enough to develop 325Vdc; and just jumper J2, 165Vdc. And I realized that I could halve the 165Vdc voltage and almost double the output current by using a full-wave center-tapped rectifier configuration on the normal secondary, which uses only two rectifiers.
Or, I could set up the jumpers for 240Vac use, but use my 120Vac wall voltage to power the primary, thereby halving the output voltage and getting the full 300Ma of output current.
But what I really liked about the concept was having a super-easy building block to quickly assemble a tube project. I could just throw a Tr-PS-2 (and its brother Tr-PS-1, a regulated low-voltage heater power supply that I will cover in the next post) into an enclosure and not worry about the power side of the project.
The complete Tr-PS-2 kit is only $49 USD and is available now at the GlassWare-Yahoo store. It includes all the parts, including the user guide, the transformer and four sets of standoffs and screws and O-rings. It is available in two power-supply voltage ratings: 250V or 450V. The 250V capacitors are 470µF in value, while the 450V capacitors are 150µF.
OpAmps & Tubes
OpAmps (Operational Amplifiers) & Tubes The more that I think about it the more certain I become that the humble OpAmp is probably the best known, best understood electronic device. Sorry, but capacitors, resistors, inductors, transformers are not electronic devices, although widely used in electronics. Strictly speaking, as the dictionary informs us, electronic devices are
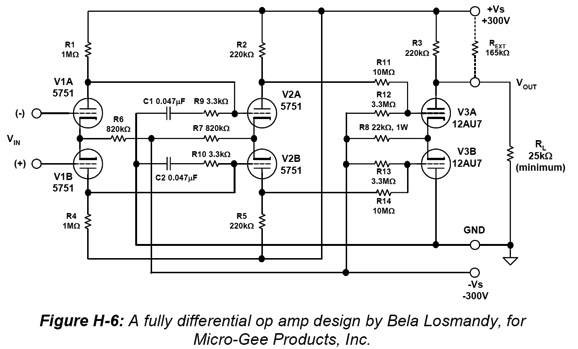
Vacuum tubes, transistors, FETs, LEDs, MOSFETs, ICs, and diodes—all are examples of electronic devices. And out of all these devices, the little OpAmp is the easiest to understand. Okay, perhaps it is a toss-up between the diode and the OpAmp; but in terms of audio use, the OpAmp is the clear winner. The secret behind this victory is that the OpAmp, although fantastically complicated inside, comes close to being just a function block, or tiny black box, whose internal workings can remain as obscure as that of your car's catalytic converter deep within its muffler. Who cares how it works, as long as it does work. An "operational amplifier" is an idealized functionality, not a technology. For example, operational amplifiers and, indeed, OpAmps have been made from vacuum tubes, as the following schematic illustrates.
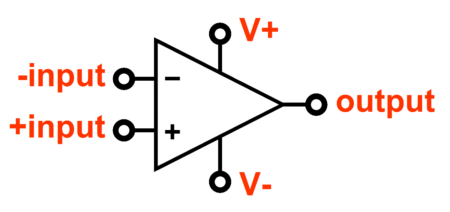
In other words, its not what's inside that is important, but how it functions, such as holding two inputs, one that inverts the input signal at the output, while the other doesn't invert the signal's phase, and offering a near-infinite input impedance from its two inputs and low output impedance from its output. At all times, the OpAmp strives to keep both inputs at the exact same voltage, using its considerable signal gain to achieve this goal. If both inputs see the same signal, the OpAmp ignores it at its output. That's it; that's the entire functionality of the OpAmp in a nutshell. (The power supply pins are a necessary evil, but not essential, as in the future OpAmps may hold solar cells on their tops or inductive coils that harvest ambient AC fields and convert the radiated energy into voltage.) Of course, there's much more to know about actual OpAmps, such as their minimum and maximum power supply and input voltages, their actual CMRR and PSRR figures, their idle and maximum output currents, their maximum slew rate, their THD and noise contributions, their input bias current, their phase margin, and their gain-bandwidth-product (GBW). And while these subtleties are complex and important, they do not obscure the OpAmp's fantastically simple functionality.
I often rate in the number beers that would be required in order to teach someone a topic or task. For example, teaching a bright fellow, who was otherwise electronically trained, how to use SPICE would take about one to two six-packs over several days; but teaching him how to read resistor color codes, only one beer and ten minutes. Well, getting him up to speed on how OpAmps function in audio circuits and the half dozen basic OpAmp circuit topologies would be about a three beer effort. In contrast, getting him up to speed on the actual circuit within the OpAmp's tiny package would take a truck-full of beer and about a year.
Two views on OpAmp performance, in audio terms, are prevalent: OpAmps are awesome, perfect beyond the wildest dreams of audiophile nirvana; and, OpAmps are not ready for prime time yet. Those who hold the first view argue that since people can only hear out to about 20kHz and only consistently detect distortion above 5%, OpAmps with bandwidth out to 1MHz and distortion below 0.1% are more than good enough for human ears. Those holding the opposing view are quick to point out the OpAmp's comparative failings. Compared to what? Either tube circuitry or discrete transistor circuits made up from resistors, capacitors, and individual transistors, each of which can be much larger than an entire OpAmp. In general, audiophiles tend to look down their noses at OpAmps, finding them as appealing as insects in the cookie jar. Not all of the OpAmp critics, however, belong to the golden-ear audiophile crowd. A good example is Samuel Groner's free and truly excellent PDF, Operational Amplifier Distortion, whose 436 pages categorize OpAmp distortion under four basic distortion mechanisms:
Note that such criteria as imaging, fluidity, transparency, or slam, did not make the list. In other words, Mr. Groner did not sit down to a evening of comparative listening; instead, he built a special test rig and performed many difficult and rigorous tests on the OpAmps. Most of the PDF's 436 pages is filled with graphs, but Groner does provide a quick capsule review of an OpAmp's performance. He is a tough critic. Here is an example, with the fairly good-sounding AD825 as the subject:
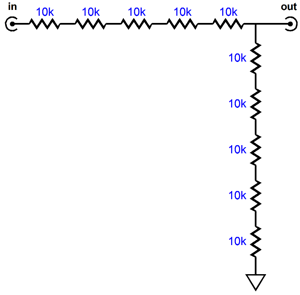
Before moving on, I must urge you to check out Mr. Groner's wonderful website, filled as it is with lots of great information from an audio pro. What would a good listening test rig look like? I like to place many devices, whether they be resistors or capacitors or OpAmps, in series, much in the same way you might test the clarity of window glass by stacking up ten panes atop each other and seeing how clear, undistorted, and un-tinted the view was through all ten. With resistors, this test was a breeze. I used perf board and two sets of ten 10k resistors in series, with the output taken at the mid point, so -6dB of attenuation obtained. I then did the same for five other brands of resistors (Corning, Dale, HolCo, Radio Shack, and two milatary-grade RN-65 types in plastic packages) so I could chose between six pairs of stereo outputs using a rotary switch, all with the same input and output impedance and attenuation. The load presented by the test rig was 16.6k and output impedance was 25k.
If greater attenuation is needed, the output can be taken further down the chain of resistors. Of course, we could place many more resistors in series. And we could build a reference out of just two resistors, say bulk-foil types or two of those huge $$$ handmade resistors that yielded the same amount of attenuation. My last trick was to remove the stop from the switch, so continuous rotation was possible; and I spun the shaft many times, before attaching a knob. In other words, I had no idea which set of resistors were being listened to by the knob's position. After several days of testing with my ears, the input signal coming directly from my CD player, I decided on a winner. All the resistors were metal-film types and the type I liked best was the HolCo resistors. (Unfortunately, I let the test box circulate and I never got it back, as I would like to perform the same test again with different resistors.) So, what would such a test rig look like for testing OpAmps?
The first OpAmp amplifies the input signal by ten, but the following two-resistor attenuator divides by ten, so unity results. In other words, no gain. Each successive OpAmp does the same, so at the end of five or ten or twenty such stages, in spite off all that came inbetween, the output signal should equal the input signal in amplitude. The big question is will it also equal in sound quality? Gentlemen, place your bets. Now, my own position is that if you can get away with not using an OpAmp, do so. This might mean using a signal transformer or tube circuit or an operational amplifier built up from discrete FETs and transistors. Often, however, these alternative options are not available to us. The CD player or DAC or computer sound card already comes chock full with OpAmps and cannot accept the other alternatives due to size and power limitations. So, if you have to use OpAmps, use as few and as high-quality as you can. Understand that, like coupling capacitors, no OpAmp is perfect. But at the same time, relish that, unlike NOS tubes, the expensive replacement Opamp will certainly outlive the life of the audio component—and you. Is it worth the effort? I have known many audiophiles who complained of their highly-rated CD player not sounding so pleasing, so they bought $800 interconnects or a $300 power cord or treated all their CDs with herbal oils or placed magic rocks about the listening room. These usually futile efforts struck me as more of a comedy than a tragedy, as the real source of discontent was $1 OpAmps. Sorry, John, but $3,000 CD players do not use $1 OpAmps in the signal path. Indeed, that's right, as $1 is what you must pay when you buy one OpAmp from Digikey or Mouser, but the CD Player's maker probably paid only 25 cents, as Jameco sells the ubiquitous NE5532 dual OpAmp for $0.31 if you buy a hundred of them. And the NE5532 litters the PCBs of many, many otherwise high-end CD players and DACs and soundcards. Why? It is cheap and it boasts good specs and, most importantly, its inclusion is often specified in the actual DAC's data sheet design example. My own history with the NE5532 is long. When I was a young man, long ago alas, a friend worked at Signetics. Knowing of my audio interests, he told me that they had a new world-champion OpAmp, the SE5534, which is the single-OpAmp version and father of the NE5532. Well, he got me a fistful of them, so new, so recently minted, that they were unmarked. I remember my eager hands clutching this small pile of gold. I remember plugging them in my IC phono stage and being transported. Yes, transported, as they revealed how poor-sounding were the previous National Semiconductor OpAmps. But then, about a year or two later, I finally finished building my discrete transistor phono stage and the SE5534 no longer sounded all that good. It wasn't a slam dunk, but it was obvious nonetheless that the SE5534 wasn't audio nirvana. Then, about five years later, I completed my first tube-based phono stage; mercy, mercy, mercy, and I never looked back on the SE5534. Well, actually that is a lie. About four years ago, I was telling a friend this story and he told me that I was making a big mistake, as the OpAmp's development is never frozen in time, for new techniques are constantly being applied to the production and even major circuit changes are implemented over time. In other words, today's NE5534 is not yesterday's SE5534. He claimed that new production NE5534 and NE5532 OpAmps are still the best choice in most audio applications. Even if I wasn't completely sold, I was tempted. The thing is that I had been regularly replacing the NE5532s that I found in my own (and friends) CD players and DACs for years, and each exchange greatly improved the sonics. Nonetheless, I bought some new, freshly-made Texas Instruments NE5532 OpAmps and sat down for some sonic shoot outs. The test was a hard one: a headphone amplifier.
Well, although this reality-check, solid-state headphone amplifier did sound better than most other solid-state headphone amplifiers (I had about three to compare it to), it just paled compared to my best tube headphone amplifier, so I never released the PCB. Probably, a huge mistake, as it is still a lot of fun.
Okay, back to the NE5532, I pulled out the Reality-Check headphone amplifier the audiophile-approved OpAmps and plugged in the NE5532s. Just like old times. No, not the warm, fuzzy nostalgia that thrills and tickles the soul, but the irksome and wearying reliving of nights wasted watching old reruns of dreadful sitcoms from the 1970s. Now, I freely admit that driving a 32-ohm load or even a 300-ohm load is brutal for any OpAmp and that perhaps the NE5532 is not as unity-gain stable as I had thought. In other words, the test was not perfect, for in a different circuit, the results might have been quite different—but I doubt it. By the way, the circuit behind the Reality-Check PCB is straight out of the Bur-Brown data sheets; and the schematic below explains why two dual OpAmps are used on the PCB.
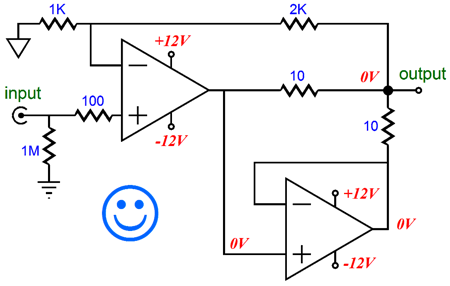
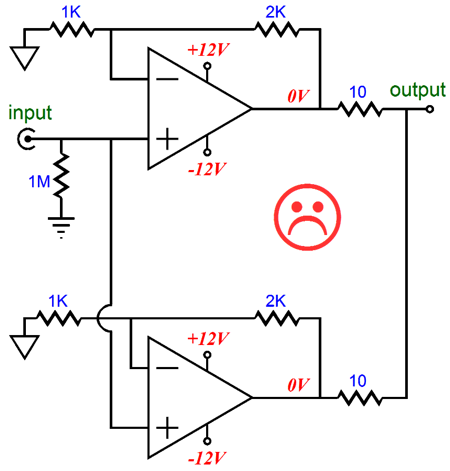
The top OpAmp is in charge. The bottom OpAmp is enslaved to the top OpAmp. The result is a substantial reduction in distortion (usually about -20dB better) over the alternative topology show below, while still allowing twice the output current to flow.
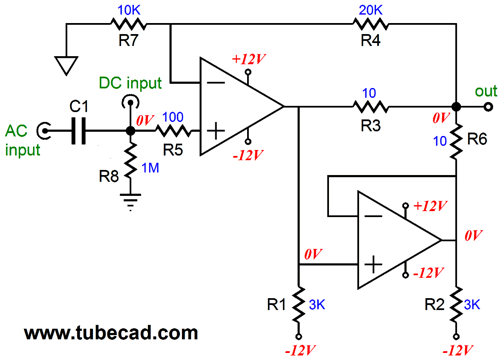
If nothing else, the Bur-Brown master-slave topology offers a substantially lower output impedance, as the two 10-ohm output resistors are enclosed with the top OpAmp's negative feedback loop. By the way, the actual circuit used on the Reality-Check PCB is as follows.
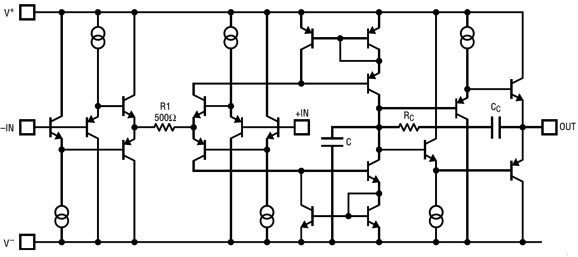
Resistors R1 and R2 a pull-down resistors that displace the crossover notch, which also force the OpAmps to run in class-A longer. Capacitor C1 is an optional coupling capacitor (I planned on using a small PIO capacitor, if I couldn't take the naked OpAmp sound). Not shown are the power-supply bypass capacitors. Of the many dual OpAmps I compared, the NE5532 was certainly my least favorite. A few years ago, a reader recommended the OPA2107 and I am so glad that he did. They sound quite refined and do not weary my ears—quite tube like. They are not perfect and they are about sixteen times more expensive than the NE5532. My HD650 quite likes them; my Grado headphones, on the other hand, usually prefer the LT1364. The LT1364 is a fascinating OpAmp, as it uses multiple diamond configurations in its current-feedback topology. (The first time I saw this schematic, I almost fell out of my chair, as I had drawn the last 3/4th of the circuit, everything to the right of R1, in a sketchpad years before, except that I failed to include the C and Cc capacitors and resistor Rc, but I did add emitter resistors for the two current mirrors.)
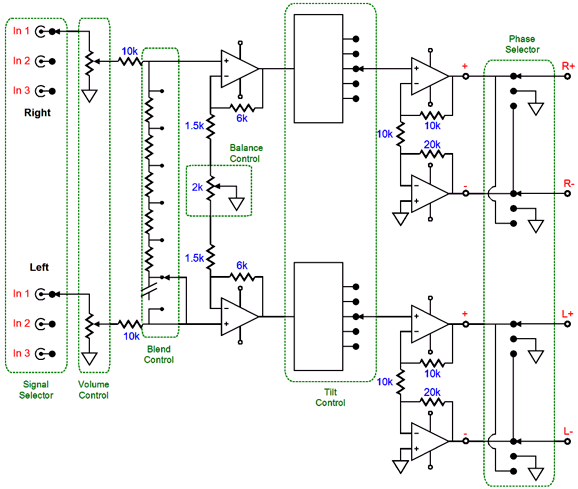
Indeed, I think that since OpAmps, in spite of all measuring about the same, sound so different from each other, we should use at least two different types and provide a means to switch between them. For example, Bur-Brown OpAmps tend to sound warm/smooth/dull, while Analog Device OpAmps tend to sound exciting/bright/metallic. Well, guess what? Many recordings sound too warm or too cool, too smooth or too brittle, too dull or too edgy. Such recordings, which comprises the overwhelming majority of recordings, could only be helped by passing through an OpAmp of the countervailing sonic signature—and only made worse by cascading into a similar sonic flavor. If the water in your bath tub is too hot, you do not add more hot water to it. Just like my Select-Capacitor switch, I would like to see a switch that selected between Bur-Brown and Analog Devices, with a third position that summed the two output together through 100-ohm resistors. Verily, sometimes you feel like a nut, sometimes you don't. By the way, not everyone thinks that OpAmps sound different or that the NE5532 is bad sounding, see Op Amps: Myths & Facts for an opposing view. In fact, one project that I would love to build is an OpAmp-based sonic control. Imagine a slim 19in faceplate with the following knobs.
With such an array of controls, we could select the signal source, adjust the volume, the amount of separation and balance between channels, impart a frequency tilt, and select the polarity of the output signal. Implementing all this functionality would be a chore with discrete components, but with three dual OpAmps, our task is relatively easy. By the way, did I fail to mention that this circuit accepts an unbalanced input signal, but puts out an (optional) balanced output.
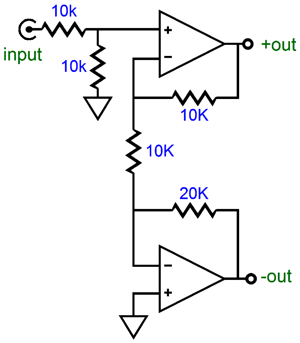
It's time to bring tubes back on the stage. What sort of load does a tube's grid present, under normal operation, i. e. no positive grid voltages? In terms of DC resistance, it is as if it's not there at all, as its input resistance is nearly infinite. In terms of AC impedance, it depends on the tube, a pentode or triode, and the circuit, a grounded-cathode amplifier or a cascode or cathode follower. But in any of these scenarios, the load presented is trivial to the average OpAmp, due to the OpAmp's low output impedance. In other words, as long as the OpAmp is not asked to swing too great an output voltage, it can easily drive a tube's grid. Well, what if we pass off to OpAmps the task that troubles most tube fanciers: phase splitting. My recent posts on phase splitters gave rise to many surprises, as the topic proved much more engaging than I had expected. The general impression I got was that most either didn't understand how a tube-based phase splitter works or feared it. Well, we can easily make an OpAmp-based phase splitter.
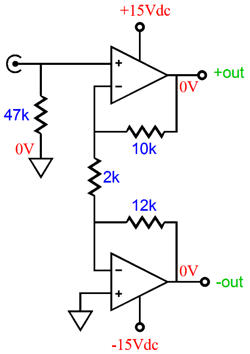
The above circuit is a unity-gain phase splitter. A 1V input signal comes out as 1V and -1V. (If a gain of 2 [+6dB] is okay, then you can eliminate the 10k resistor in series with the input signal.) This circuit converts an unbalanced input signal into a balanced pair of output signals and it can be modified to provide gain, by setting the three feedback resistor values. For example, here is a phase splitter with a gain of 6 (+15.5dB).
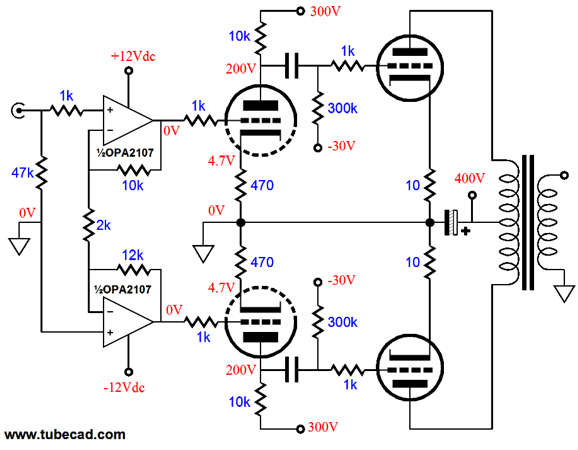
Why isn't the 10 feedback resistor matched by a 10k resistor on the bottom OpAmp? Good question. The top OpAmp functions as a non-inverting amplifier and the 2k feedback resistor is effectively grounded at the bottom OpAmp's inverting input. Remember, the rule that an OpAmp always strives to maintain the exact same voltage on both its input pins; and since the bottom OpAmp's non-inverting input is grounded, its inverting input mirrors this voltage (0V). Thus, the top OpAmp's gain is the result of adding the 2k resistance to the 10k resistor and then dividing this sum by 2k, yielding a gain of (2k + 10k)/2k or 6. The bottom OpAmp, on the other hand, functions as an inverting amplifier whose gain is equal to 12k divided by 2k or 6. Or, viewed from a different, but equally true perspective, the bottom OpAmp functions as an I-to-V converter, with the 12k feedback resistor setting the conversion ratio. So, how much current flows into this I-to-V converter? If 6V appears at the top OpAmp's output, then 6V/(2k + 10k) or 0.5mA of current flows, which into the 12k resistor creates -6V at the bottom OpAmp's output. Okay, let's now add this simple phase splitter to an equally simple push-pull power amplifier.
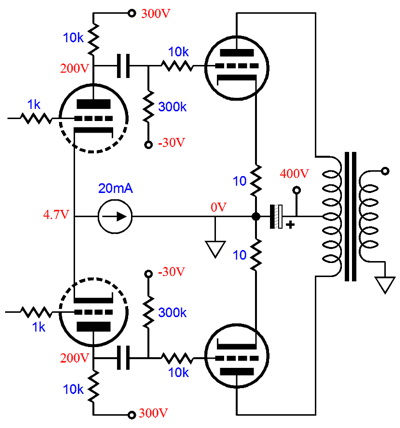
The balanced output signals are presented to the two grounded-cathode amplifiers, which then drive the two output tubes. As straightforward as it gets. I labeled the OpAmps as being the dual OPA2107 OpAmp designed by Bur-Brown and now made—as are just about all OpAmps—Texas Instruments, which I like a great deal, but which has recently become more expensive; maybe the word has finally got out about how good it sounds. Nonetheless, it was probably a mistake to have specified any OpAmp type, as ten years from now, who knows what will be the hot OpAmp of the day. The driver tube didn't get labeled, but I had the 6CG7 or 6SN7/12SN7/12SX7 in mind. Now, we could easily get extra fancy. For example, we could add a constant-current source to the driver stage.
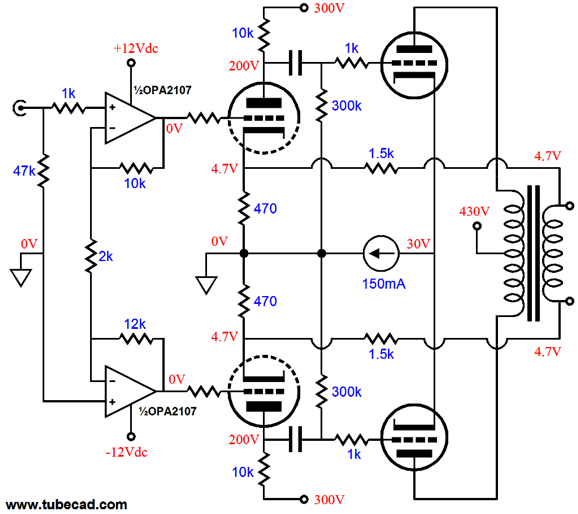
Or, we might try adding a negative feedback loop; indeed, two negative feedback loops.
The two 1.5k feedback resistors attach to the output transformer's secondary, feeding back the amplifier's output to the driver stage, which makes adjustment to bring the outputs in line with the input signals. Why isn't there a ground connection on the secondary? Three reasons: it would place the 1.5K resistors in parallel with the 470-ohm cathode resistors (in DC terms), which would throw the cathode-bias voltage off; it would require having a center-tapped on the secondary, which is difficult to obtain the exception is if you are using the 16-ohm tap, as the 4-ohm tap is its center-tap; and it would make difficulties with common-mode signals, as it would effectively ground the two 15k feedback resistors. On the other hand, not attaching the secondary to ground means that the cathode voltage on the driver stage will be present at the outputs, but as the DC voltage is the same on both speaker terminals, it does no harm to the speaker. In addition, we must change the attachment of the top 1.5k feedback resistor to whichever output tap we are using, not that this is a big deal. What is a big deal, at least for me, is the output transformer. The negative feedback loop encompasses both its primary and secondary, which make me nervous. True there are only two active stages and one set of coupling capacitors, which is much better than three or four gain stages and three sets of coupling capacitors. No, it's the transformer that gives me qualms, for even the finest output transformer is a squirrelly device, compromised as it is by leakage inductance, stray capacitances, its wire's DCR, magnetic non-linearity and hysteresis, and core losses. Well, that's why we should wrap a negative feedback loop around the accursed thing, you might think. But what happens if the phase shifts are too great? What began as an amplifier can turn into an oscillator. From the great old magazine, Wireless World, in 1955, we read a good article by R. F. Gibson, Output Transformer Design For Amplifiers Employing Negative Feedback. Here is a brief quote:
Now, if I had a degree in journalism, I would probably stop the quote right there, but here it continues:
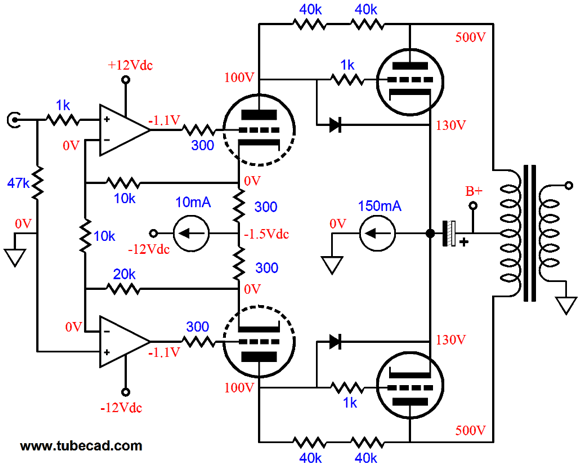
He goes on to explain how a good output transformer can be assembled. Good luck with that on your kitchen table. No doubt, I am being too pessimistic here, as such a setup would probably work just fine, given a half decent output transformer and a modest amount of feedback. Nonetheless, this got me thinking about how I could keep the negative feedback loop on the primary side of the output transformer. Here is my answer.
Two negative feedback loops reside within this circuit. The first is the feedback loops that allow the OpAmps to control the current flow through the 6SN7 driver triodes. The second is the loop that extends from the power output triode's gird to its plate, via the two in series 40k feedback resistors. This is an old topology, known as the partial feedback amplifier. Long-time readers will remember the March of 2001 issue of Tube CAD Journal, which held a long article on this arrangement, and which I just updated its formatting, so it no longer looks garbled—the result of using Microsoft products long ago. (The PDF, however, still looks fairly good, so was left intact, although the schematics are clearer in the revised web pages.) The output tubes, in this example could be a pair of KT88 or a 300B or KT120 or EL34 tubes, are DC coupled to the 6SN7's plates, which completes their current path to the B+ connection through the two 40k feedback resistors and half of the output resistor's primary. This is not partial feedback, but 100% feedback, thus the better name than "Partial-Feedback" would be "Entire-Feedback" or "Complete-Feedback," but I prefer "Ultra-Empathic." "Empathic" means: of, relating to, or characterized by empathy, which in turn means identification with and understanding of another's situation, feelings, and motives, but I am sure everyone already knew that. Well, in this feedback circuit the 12AU7 presents a near infinite plate impedance, so virtually all of the voltage movement at the KT88 plate is relayed to the KT88's grid, which effectively makes for 100% degenerative feedback, just as in a cathode follower. Very empathic indeed. More to come. //JRB
Next Time
For those of you who still have old computers running Windows XP (32-bit) or any other Windows 32-bit OS, I have setup the download availability of my old old standards: Tube CAD, SE Amp CAD, and Audio Gadgets. The downloads are at the GlassWare-Yahoo store and the price is only $9.95 for each program. http://glass-ware.stores.yahoo.net/adsoffromgla.html So many have asked that I had to do it. WARNING: THESE THREE PROGRAMS WILL NOT RUN UNDER VISTA 64-Bit or WINDOWS 7 & 8 or any other 64-bit OS. I do plan on remaking all of these programs into 64-bit versions, but it will be a huge ordeal, as programming requires vast chunks of noise-free time, something very rare with children running about. Ideally, I would love to come out with versions that run on iPads and Android-OS tablets.
//JRB |
I know that some readers wish to avoid Patreon, so here is a PayPal button instead. Thanks. John Broskie
Kit User Guide PDFs
And
High-quality, double-sided, extra thick, 2-oz traces, plated-through holes, dual sets of resistor pads and pads for two coupling capacitors. Stereo and mono, octal and 9-pin printed circuit boards available.
Designed by John Broskie & Made in USA Aikido PCBs for as little as $24 http://glass-ware.stores.yahoo.net/
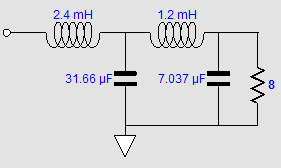
The Tube CAD Journal's first companion program, TCJ Filter Design lets you design a filter or crossover (passive, OpAmp or tube) without having to check out thick textbooks from the library and without having to breakout the scientific calculator. This program's goal is to provide a quick and easy display not only of the frequency response, but also of the resistor and capacitor values for a passive and active filters and crossovers. TCJ Filter Design is easy to use, but not lightweight, holding over 60 different filter topologies and up to four filter alignments: While the program's main concern is active filters, solid-state and tube, it also does passive filters. In fact, it can be used to calculate passive crossovers for use with speakers by entering 8 ohms as the terminating resistance. Click on the image below to see the full screen capture. Tube crossovers are a major part of this program; both buffered and un-buffered tube based filters along with mono-polar and bipolar power supply topologies are covered. Available on a CD-ROM and a downloadable version (4 Megabytes). Download or CD ROM
|
|||
| www.tubecad.com Copyright © 1999-2014 GlassWare All Rights Reserved |
