| John Broskie's Guide to Tube Circuit Analysis & Design |
|
13 October 2020 Post 516
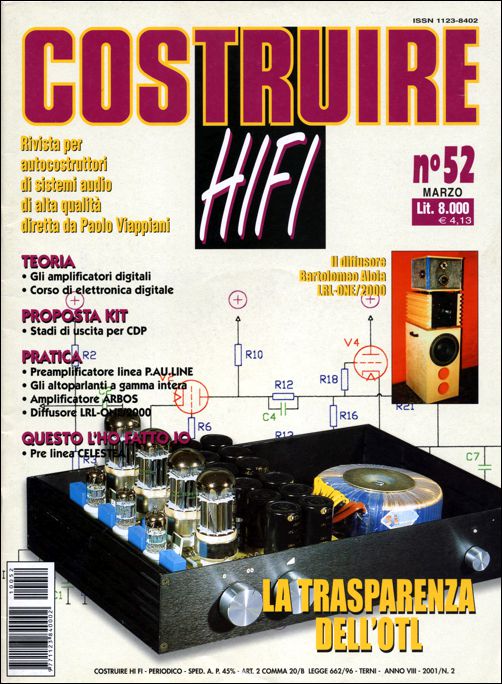
Ever since writing on the topic of two-stage amplifiers in post 512, a distant memory of an OTL amplifier (made from two independent amplifier stages in cascade) haunted my mind. I remembered seeing it in a foreign magazine, probably an Italian or German audio magazine. Well, finding the magazine proved difficult, but I finally located it. I instantly spotted the right magazine, as the OTL made the cover of 52nd issue of the Italian magazine, Costruire HiFi, from 2001.
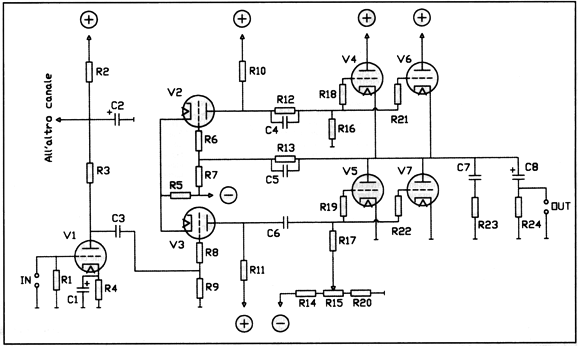
The OTL is a totem-pole design somewhat like the Futterman OTL, in that it uses a monopolar power supply and a large output coupling capacitor. Here is the schematic of Fulvio Chapetta's effort. AMPLIFICATIORI OTL
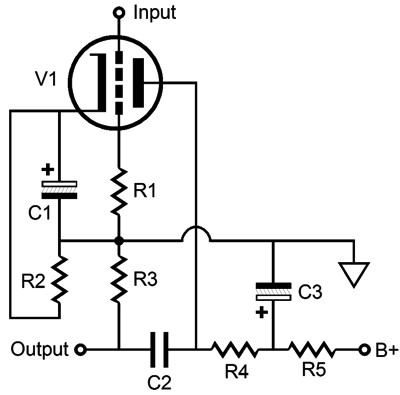
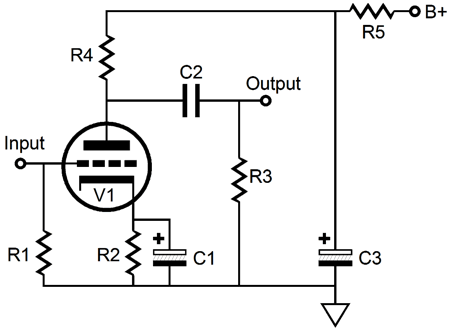
I translated the original schematic into my own format and included all the part values. By the way, often redrawing a schematic is enough to make the seemingly obscure abundantly obvious. Don't believe me? Quick, tell me what tube topology the following circuit represents.
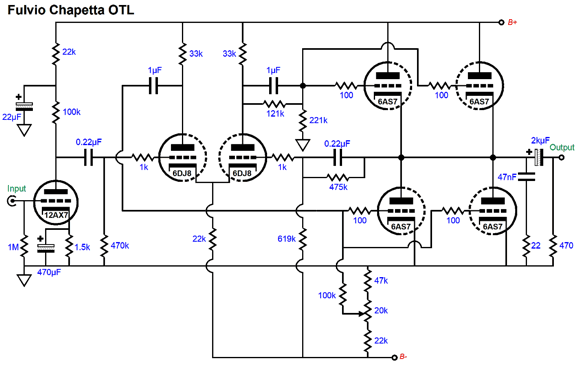
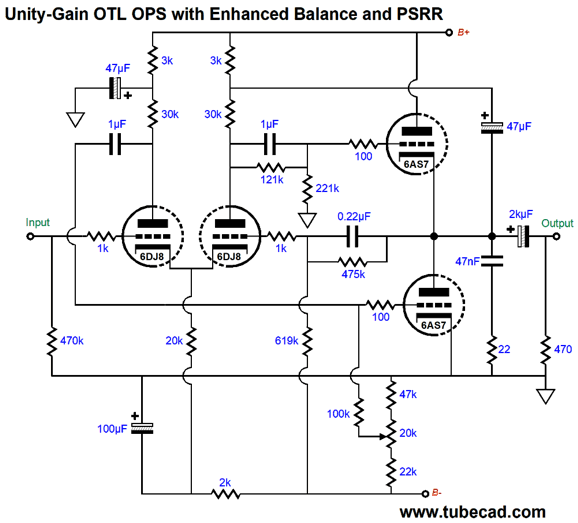
Answer is found at bottom of this post. I discovered this mental trick as a college student when I came upon a passage I couldn't understand, as rewriting it in my own words made the message (or the lack of a message) obvious. Later in my life, I encountered Audio Research schematics, which seemed to require heavy hits of LSD both to have drawn the schematic and to make it comprehendible. To be fair to Audio Research their motive might have been only ensure that the entire schematic fit on one page of 8.5 by 11 paper—no matter how many origami twists were required. Check out post 300 for tips on the art of drawing snazzy schematics. Okay, here is the redrawn OTL schematic.
Much better—at least to my eye, as I like to see continuity, the unbroken B+ voltage feed, the ground that attaches to nine parts. In addition, familiar circuit topologies surface, such as the grounded-cathode amplifier input stage, the differential amplifier driver stage, and the totem-pole output stage. Moreover, I can now readily see that the amplifier consists of two amplifiers: the input stage that runs negative-feedback-free and the output stage whose 100% negative feedback loop results in a unity-gain output. You don't see the 100% negative feedback? The 0.22µF coupling capacitor that is shunted by the 475k resistor returns the entire AC output to the inverting input of the differential driver stage, but only 57% of the DC signal at the union of all four output triodes. The DC signal is important, as the driver stage DC couples to the top output triodes through the 121k resistor that shunts the 1µF coupling capacitor. In other words, the driver stage strives to center the voltage division between top and bottom output triodes. Based on the power supply schematic in the article, I conclude that the B+ voltage is 330Vdc and the negative power-supply rail voltage is -220Vdc. Okay, let's divide the B+ voltage by 2 and we get 165Vdc. Next, let's add 165V to 220V and get 385V. What is the result of multiplying 57% against 385V? Answer: about 220V. In other words, the two-resistor voltage divider made up of the 475k and 619k resistors deliver 0V to the differential amplifier's inverting input when the output triodes evenly divide the B+ voltage. (Along with some help from tweaking the bias potentiometer.) The 47nF capacitor and 22-ohm resistor at the output define a Zobel network that gives the output stage something to bite on at high-frequencies above 15 kHz. The 2kµF output coupling capacitor allows low-frequency bandwidth down to 10Hz with 8-ohm loads. The power supply used a large toroid with three secondary windings: 230Vac, 150Vac, and 12.6Vac. Each 6AS7 output tube draws 2.5A at 6.3V, so placing the heaters in series-parallel results in only 5A of current draw with the 12.6Vac winding. Okay, what's to like and to dislike? Many will disagree with me, but I like having the large output coupling capacitor, as it offers far greater protection of the loudspeakers. DC coupling is inherently dangerous. Tubes can fail to conduct from an open heater element or, what's much worse, arc. Imagine a bipolar power supply and a DC-coupled output stage; then, imagine if the 6DJ8 was missing from its socket. Goodbye speakers. The top output triode would see a huge positive voltage at their grids and the output would slam upwards, delivering DC current into the woofer's voicecoil. With the output coupling capacitors in place, however, the loudspeakers are safe. But don't output coupling capacitor suck? All large-valued capacitors suck, including those in the power supply, which are also in the signal path, albeit circuitously. The big difference is that we know that the output coupling capacitor is obviously in the signal path, so we make extra effort in finding the best capacitor we can and purposely bypass it with high-quality film capacitors. Power-supply capacitors seldom receive the same attention. I also like the super short negative feedback loop, as the fewer devices, both active and reactive, contained within the loop's scope the better. And the grounded-cathode amplifier input stage with the bypassed cathode resistor will produce a riper sonic signature, which will help even out the entire amplifier's harmonics, as the unity-gain output stage will produce predominately odd harmonics. What's not to like? The output stage and driver stage are inherently unbalanced, which the 100% negative feedback helps hide, but nonetheless subtracts from potential performance.
Simply put, the top output triodes need to see a much larger input signal than the bottom output triodes, as the top triodes' cathode swing up and down with the output signal, while the bottom output triodes' cathodes are grounded. Remember, the output tubes must see the same magnitude of input signal from their cathodes to their grids, not from ground. Fortunately, the workaround is easy enough: we bootstrap the right plate resistor in the driver stage to the output. (See post 418 for more details and to see two other possible arrangements that also establish balanced drive signals using the differential amplifier.)
Note that I tried to retain as many of the original part values as possible. The 47µF capacitor that attaches to the output restores balanced drive for the output tubes. In addition, it equalizes the output impedance of the top and bottom output triodes, and it allows for much larger output voltage swings from the right side of the differential amplifier. The second 47µF capacitor decouples the power-supply noise from the differential amplifier's left plate resistor. I added the RC filter made up of the 100µF capacitor and 2k resistor at the negative power-supply rail for two reasons. The first is that the filter scrubs away ripple; the second, the 100µF will take some time to charge up, which buffers the turn-on shock to the 6DJ8. Of course, a much larger capacitor would increase the charging-up time, say a 470µF capacitor. Now that we are mentally warmed up, we can examine a bipolar-power-supply version of this unity-gain output stage.
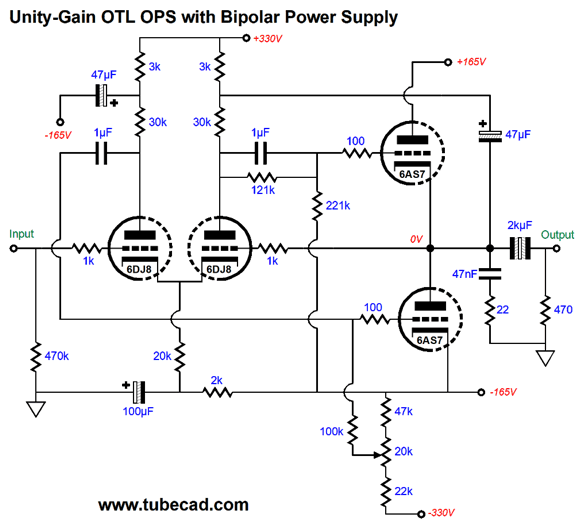
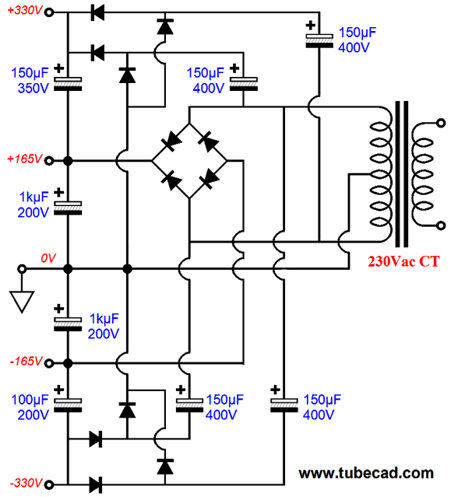
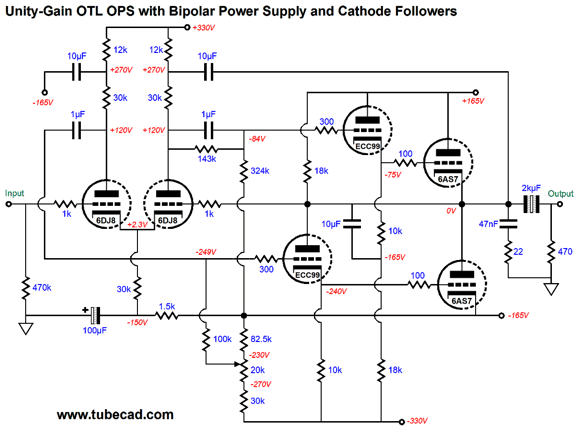
Note the four power-supply rail voltages, +/-165Vdc and +/-330Vdc. Also note that the output stage centers at 0V. So why did I retain the output coupling capacitor? Safety and the chance to use a much better-sounding coupling capacitor: a non-polarized electrolytic capacitor, which need only be rated for 100V, not 350V. Ten 200µF non-polarized electrolytic capacitors in parallel gets us to 2kµF of capacitance, but far lower series inductance. In addition, the spacing between capacitors allows for better cooling of the output capacitors. Moreover, the 100V capacitors are small. The extra-credit topological move was terminating the second 47µF decoupling capacitor not to ground but to the -165V power-supply rail, as this greatly enhances the PSRR. (In the schematic, we see 47µF electrolytic capacitors, but I would use 630V film capacitors instead. By the way, 20µF would probably suffice.) We want the drive signal delivered to the bottom output triodes to include all the power-supply noise that their cathodes see, which was terminating the second 47µF decoupling capacitor to the -165V power-supply rail accomplishes. I know that several readers will take issue with the four power-supply rail voltages, assuming that multiple power transformers will be needed. Not so. The power supply can be made from a single center-tap 230Vac secondary.
The +/-165Vdc power-supply rails undergo the heavy current demand, which explains the larger capacitor values. In fact, as I look at it, I would probably up the capacitance, say using four 1kµF/200V snap-in capacitors in parallel in place of a single 1kµF capacitor. The increased power-supply capacitance (4kµF) would result in over 100 Joules of wallop available to the output stages. (Most solid-state power-amplifier power supplies offer between 20 to 50 joules.) I would use two power transformers, one that held two 12.6Vac secondaries for the heaters and one for the high-voltage power supply. This arrangement allows for a staggered turn-on, where we first apply the heater voltage before we fire up the high-voltages, which will extend the tube's lives. Returning to the output stage, I would at least double the number of output tubes, and I would add cathode followers to drive the output tube grids. Why? We can certainly expect the output tubes to be driven into positive-grid current, which the cathode followers could accommodate easily.
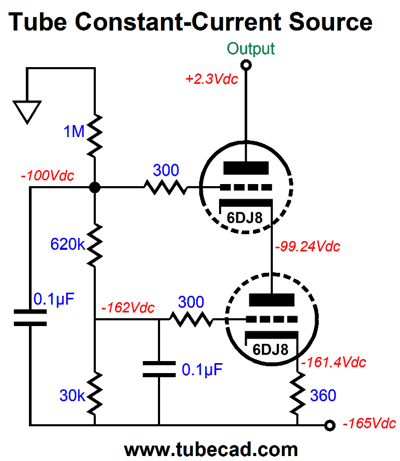
This is my signature cathode follower arrangement for an OTL output stage, as both cathode followers see equal cathode-to-plate voltage swings and cathode current flows. Remember, the secret to clean push-pull operation is balance, first, second, and last. See post 417 for more information. Okay, what further improvement is possible? The last weak link is the differential driver stage's long-tail cathode resistor, which we could replace with a constant-current source, either a solid-state or vacuum-state device. How about a cascode-based constant-current source?
The cascode intrinsically presents a high output impedance, which we supercharge by using a larger cathode resistor value. In SPICE simulations, the output impedance was 463k, which is 21 times greater than the 22k long-tail resistor used in the original circuit. If we seek an even higher output impedance, we can replace the 360-ohm cathode resistor with a 10mA solid-state constant-current source, such as a FET or the LM334. My own take is that the 463k is plenty high, as it is the equivalent of using an actual 463k/50W cathode resistor and negative power-supply rail voltage of -4,630Vdc. That's one long tail. Moving to the input stage, we can get extra fancy and replace the grounded-cathode amplifier with a cathode-coupled amplifier.
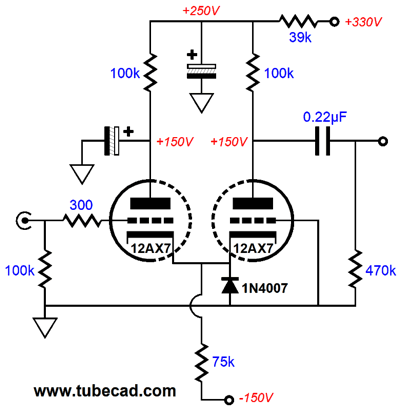
The cathode-coupled amplifier offers low distortion and input capacitance and no phase inversion. The negative power-supply rail is put to use and the 1N4007 diode protects the 12AX7 tube at start-up, as it prevents the cathodes from being 165 volts more negative than the grids when the tube is still cold. Once the 12AX7 heats up, the cathode voltage will rise to over 1V and the diode drops out of the circuit. By the way, we can easily use a balanced input signal to drive the cathode-coupled amplifier input stage.
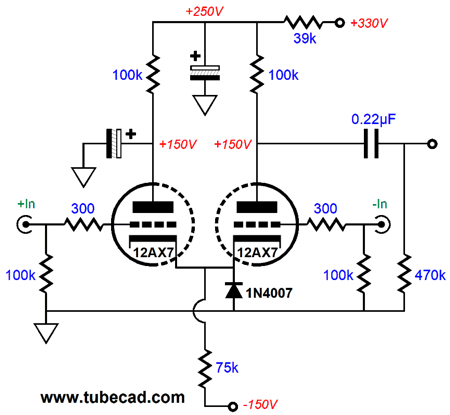
The balanced input signal effectively doubles the gain of the cathode-coupled amplifier. Another possible use for the inverting input of the cathode-coupled amplifier is to apply a global negative feedback loop, so the output signal is returned to the cathode-coupled amplifier. This would necessarily decrease the amplifier's gain, but as tube-based line-stage amplifiers usually deliver big output voltage swings, this arrangement might not be a liability. Such a setup would include the output coupling capacitor within the negative feedback loop's scope. End
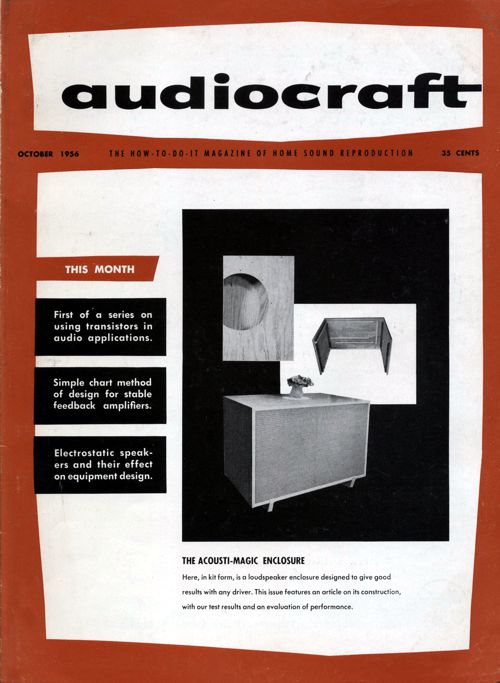
In my quest for tube-related clipart in old electronics magazines, I found the following interesting article by the great Norman Crowhurst in an audiocraft magazine, October issue from 1956. His design incorporates two negative feedback loops between the driver stage and the output tubes' plates, along with a global negative feedback loop that includes the output transformer's secondary.
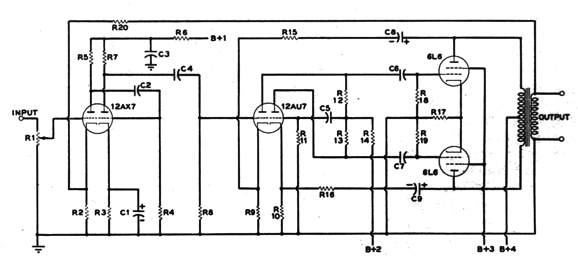
Designing Your Own Amplifier Part V: Feedback Amplifiers THERE are so many matters to consider in the design of a feedback amplifier that discussion of them will get rather confusing unless we use a practical amplifier for illustration. In this article let us work with the schematic diagram in Fig. 1, which shows the outline of a circuit with the components identified by numbers, and complete the design of this feedback amplifier step by step, filling in the values as we determine them. In this way we shall be sure to cover the practical problems that have to be solved. A good feedback amplifier cannot be obtained by designing a reasonably good amplifier and then adding feedback for good measure. This approach, believe it or not, can sometimes produce an amplifier with greater distortion than one that does not employ feedback. The first thing to do is to go through the amplifier, starting at the output, and calculate the operating conditions for the tubes and the maximum levels they will handle, incorporating or allowing for feedback as we go.
Fig 1. Schematic for a feedback amplifier, whose design is developed in the text. The inner feedback loop uses components C8, C9, R9, R10, R15 and R16. Overall feedback loop uses R2 and R20.
Output Stage Let's assume that we are designing a good 20-watt amplifier. For self-biased 6L6's in the output stage, the tube data manual shows the following tabulation of operating conditions for 24 watts output, with an optimum load of 9,000 ohms.
We will assume that we shall use such an output circuit. That sets the cathode bias resistor, R17, at 250 ohms. This 24 watts in the plate circuit will be mean or average maximum watts, so the peak value will be twice this, or 48 watts. The formula W = V²/Resistor can be altered to the form V = √WR, to determine the peak maximum- signal voltage across the primary winding of the output transformer. This is √(48 x 9,000) or 650. Then there will be a peak voltage of 325 volts on each half of the primary. We shall need this figure presently to calculate the inner feedback loop values of R15 and R16. Next we move back to the grid circuit of the output stage. The total cathode current of the two 6L6's at maximum output is just under 120 mA. This current, in the 250-ohm bias resistor, will produce a bias of 29 volts at maxi mum signal; which means the peak drive to each grid for maximum output also needs to be 29 volts.
Drive Stage; Inner Loop The 12AU7 tube, shown in the drive stage, is similar to the 6SN7 except that it happens to be of the miniature type. In the article on the design of phase inverters it was found that a floating paraphase circuit could quite successfully provide a drive of about 29 volts to each output tube grid with a plate supply of 250 volts. We can obtain a good safety margin here by utilizing the plate supply for the 6L6's for the B+ to the 12AU7 prove convenient, because the feedback places extra demands on the paraphase action, as we shall see in a moment. Using a plate-load resistor of 100 k, with a cathode resistor of 2.2k and a plate supply of 250 volts at the junction of the three resistors R12, R13, and R14, will give a gain of approximately 13. These values will produce 3.7 volts bias with 1.7 mA plate current. The plate current of two tubes will be 3.4 mA and the drop in the common resistor, R14, will be 110 volts, from 360 to 250. This means that R14 should be about 33k. Now we must digress a moment to consider the voltages involved in the inner feedback loop. The purpose of this loop is to reduce the plate resistance of the output stage to a point at which variations in output load impedance will not cause appreciable changes in the outer-loop feedback, thereby improving stability under varying load conditions. The plate resistance of the tubes is not listed, because it varies widely over the operating distance of the load line. A good estimate, however, would be that its average value throughout a signal cycle will not vary much more than about five times the optimum load resistance. Thus, if we can reduce this effective ratio by 5:1, using the inner loop, a change of load impedance from optimum value to open circuit will only change the outer-loop feedback by a 2:1 factor. This is an economic point to choose: further reduction will make unreasonable demands on the drive stage that will not produce commensurate advantage in the outer-loop stability; less reduction will sacrifice much in potential outer-loop stability. Having settled that we need a 5:1 gain reduction by this inner loop, we can figure values and voltages. A gain of 13 from grid to plate of 12AU7 means that its grid-to-cathode swing has to be 29/13 = 2.2 volts approximately. To reduce gain by 5:1, the grid-to-ground voltage must be 5 x 2.2 = 11 volts, while the cathode-to-ground voltage will be the difference, 8.8 volts. To get 8.8 volts across the cathode resistors, R9 and R10, from the 325 volts on the output tube plates, the feedback resistors R15 and R16 must be 2.2k x 325/8.8 = 81k. The nearest preferred value is 82k, which will be close enough. A voltage of 325 across a resistance of 82k works out to almost 1 watt peak dissipation, so 1-watt resistors should be used. This indicates that these feedback resistors will absorb about 1 watt of available output, so if the output transformer is reasonably good, there should still be 20 watts left at the secondary. The left-hand half of the 12AT7 will get its 11 volts grid-to-ground drive from the previous stage, but the right-hand half gets it from the floating paraphase junction. The junction of the three plate resistors coupled to the grid of the second half of the 12AU7 by C5 has to produce a swing of 11 volts to match that of the first half; this must be produced by having the plate current swing of the first half greater than that of the second half by a sufficient amount to produce 11 volts swing in R14. With our assumed plate-load resistors, 100k, and a plate swing of 29 volts, each tube should have a swing of about 0.35 mA. To get a swing of 11 volts across the 33K resistor R14, we need a difference in swing of 0.33 mA. If we choose values such that the average swing is 0.35 mA, and the difference in swing is 0.33 mA, we will need a swing of 0.52 mA on the first half tube and 0.18 mA on the second half tube. This you can figure by algebra or by any method you prefer. The first, or left-hand, half of the 12AU7 must produce 29 - 11 volts across R12, because the 11 volts is in phase with this output; the current swing is 0.52 mA, so R12 should be 18/0.52 = 35K. 33k at 5% would be near enough. For the right-hand half, the current swing is to be 0.18 mA; the voltage swing, 29 + 11 = 40 volts, so R13 must be 40/0.18 = 220k. This will provide equal drive for both output grids. The operating conditions of the two halves of the 12AU7 will differ slightly, but any residual differences can now be taken care of by feedback, using close-tolerance values for resistors R9, R10, R15, and R16. Thus we have now calculated the important values associated with the 12AU7 and 6L6 tubes. The grid resistors, R18 and R19, can be 330k. This will be an approximate compromise between shunting down the 12AU7 too much and providing too high a resistance in the grid circuits of the 6L6 tube. The grid resistor, R11, can be 1M to avoid shunting to any appreciable extent the 11 volts provided by the difference current. We shall consider R8 in the design of the 12AX7 amplifier stage.
First Stage; Turning to the 12AX7 data we find that, with a plate resistor of 100k, a plate-supply voltage of 180 volts, and the following grid resistor of 470k, each tube section gives a gain of 52 and a peak output of 32 volts. Since we require only a peak of 11 volts, this gives a margin of approximately 3:1; distortion should be well down even before feedback is applied. The cathode resistor recommended with the following grid resistor of 470k is 2,200 ohms. This data was obtained from the RCA tube manual. Similar information could be obtained from any other manual, although the figures may differ a little, or data could be based on published curves as described in earlier articles. Two stages, each giving a gain of 52, will produce a total over-all gain of about 2,700. If the output from these stages is to be 11 volts, the input must be about 4 mV. We would like to end up with a damping factor of about 10. Therefore we must use about 20 dB over-all feedback , which will reduce the gain by a ratio of 10:1 and increase the damping factor, at present approximately unity, by 10 times. This means that we will need to supply a signal of 36 mV peak across R2 from the secondary of the output transformer. Assuming the output transformer is designed to match from 9,000 ohms to 16 ohms, the simplest way of calculating the voltage that should appear on its secondary is to figure out what voltage gives 20 watts across 16 ohms. This is 40 watts, since we are working in peak voltages, so the voltage will be √(40 x 16) = 25 volts, approximately. Again working by voltage ratio, if we have 36 µF across 2.2k ohms, R20 will need to be 25,000/36 x 2.2k = 1.5 Meg. This has given us all the resistance values in the circuit except R6, which we will consider later. We now know that the amplifier will be driven to full output by an input of 40 mV peak, which is about 28 mV RMS. This is quite a convenient input, because it will produce full output on some low-level inputs. We might want to use a preamp, however, in which case 28 mV would be too small an input: most preamps have a normal output in the region of 1 volt. To take care of this we can insert a preset gain control R1, for which a suitable value would be 250k.
Low-Frequency Response of Now we must tackle the question of suitable values of coupling and other capacitors. This is where the stability criterion and response factors of the feedback arrangement become important. First we take the short-loop feedback; this includes, at the low-frequency end, the coupling capacitors C6 and C7 in the feedback loop. There are then two sets of reactor elements in this feedback loop. We want to keep the response of this section as flat as possible, and roll it off fairly sharply at the end of a band somewhat wider than the response band we ultimately require.
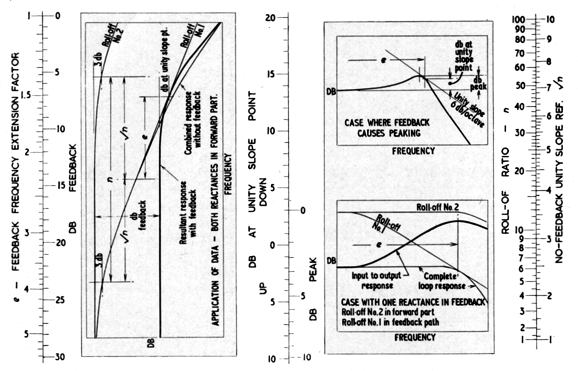
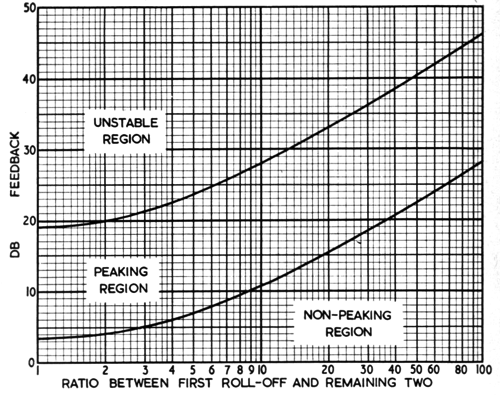
The charts in Fig. 2 are useful in the design of two-stage coupling arrangements with feedback. They give the response around the loop when the feedback is closed. To avoid any possibility of transient effects, the response should be not less than 6 dB down on the scale on the left-hand side of the center line. We are using a feedback ratio of 5:1, which represents 14 dB. Aligning these two points, 14 dB at the left, with 6 dB in the center, we find that the rolloff ratio on the right-hand scale has to be almost 20. If C8 and C9 were not in the feedback loop — that is, if the output were taken across resistors R15 and R16 directly — then the rolloff would be 6 dB down at a frequency determined by dividing the midway frequency, between the rolloffs given by C6 and C7 and their associated resistances, by the factor 2.24 ( found on the left-hand side of the left-hand scale, opposite 14 dB). But C8 and C9 are in the feedback loop, and their reactance is included in series with the resistances R15 and R16 in determining the output voltage. So, if the low-frequency rolloff provided by C8 and C9 is 20 times that provided by C6 and C7, the resultant loop response would be about 6 dB down at a frequency 2.24 times that of the rolloff at C6 and C7. But at this, frequency the reactance of C8 and C9 would be about 9.5 times the resistance values of R15 and R16, which means there would be a boost of almost 20 dB, added to the loss of 6 dB, producing a resultant peak of about 14 dB at this frequency. To avoid this effect it is necessary to have the rolloff provided by C8 and C9 operate at a frequency lower than that provided by C6 and C7. Then we shall be perfectly safe, and the effective roll- off frequency will be much lower than that without feedback. Therefore, we pick values of C6 and C7 to give a rolloff at 20 Hz. With R18 and R19 at 330k, the reactance of C6 and C7 should be somewhere around 330k at 20 Hz. A suitable capacitor value is .025 pF. Now we need a value for C8 and C9 that will roll off at 1/20th of this frequency, or at 1 Hz. The reactance required is 82k; a capacitor to give a reactance of 82k at 1 Hz is 2 µF. Small tubular electrolytics can be obtained with a capacitance of 2 pF at a working voltage of 450 volts. These should be quite satisfactory for C8 and C9. The signal-voltage swing at this point is 325 volts peak, so any leakage current is not likely to introduce noticeable noise in the circuit. The 14dB of feedback over this output loop will reduce the effective rolloff point of C6 and C7 by a ratio of 5:1, so that now the rolloff of these two stages will be 3 dB at about 4 Hz. To avoid unbalance, or phase shifts at the low-frequency end, C5 should roll off well below 4 Hz in conjunction with the 1-M grid resistor. A 0.25-µF capacitor gives a reactance of 1 M at about 0.65 Hz. This should be quite satisfactory for this position in the circuit.
High-Frequency Response of The high-frequency end is not so simple to evaluate in exact terms. We can only make a guess at it. The plate resistance of the 12AU7 is listed at 7,700 ohms. This will be from each plate to ground, and the capacitance shunting this resistance will be that of the stray wiring including the coupling capacitors C6 and C7, which are quite small physically, and the grid input capacitance of the 6L6's. This should not add to more than about 50 pF altogether, which has a reactance of 7,700 ohms at about 400 kHz. To comply with the no-transient-distortion condition previously specified, we need to have a 20:1 ratio in high- frequency rolloff frequencies. In the output circuit, the 6L6 has a plate-to- plate load resistance of 9,000 ohms, which takes the form of 2,250 ohms from each plate to ground. The plate resistance will be about 10 times this value, or 22,500 ohms per tube. Assuming the amplifier is correctly loaded with its 9,000 ohms plate-to-plate, the impedance at each plate will be about 2,000 ohms to ground, or 8,000 ohms plate-to-plate. This should then be bypassed with a capacitor that will give a rolloff at 20 kHz. At 20 µF a reactance of 8,000 ohms would be given by a .001-µF capacitor, connected across the primary of the output transformer. Without feedback this would give a rolloff of 3 dB at 20 kHz. The effect of the feedback, with the staggered roll off arrangement, is to increase the roll- off frequency to about 9.5 times 20 kHz for 6 dB loss, or 190 kHz. There will then be no detectable loss at 20 kHz.
Low-Frequency Response, We have the last two stages designed, complete with feedback, to give rolloffs of 3 dB at 4 Hz and 6 dB at 190 kHz. Now we can proceed to determine the circuit constants for the rest of the amplifier to suit the 20 dB feedback applied over-all.
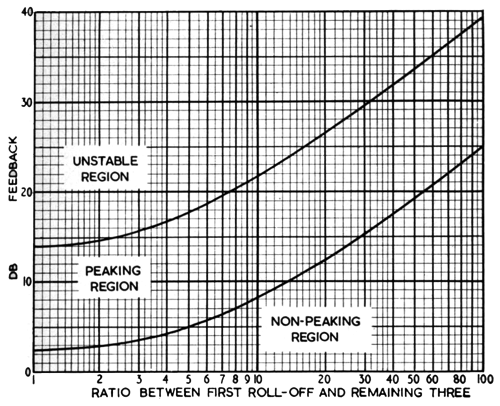
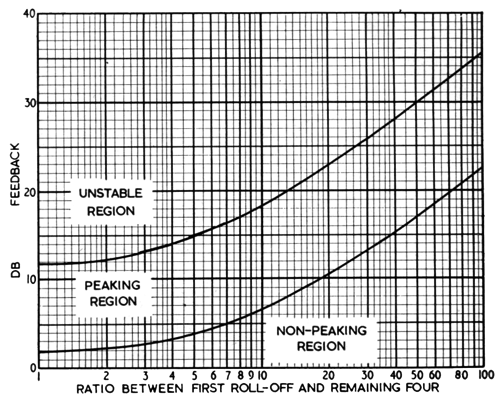
Fig. 3. Limit chart for feedback loops in which three reactances contribute to the rolloff of response. The ratio is between the rolloff acting nearest the pass band of the amplifier, and two others about equal in cutoff frequency. The reactances contributing to low-frequency rolloff are the coupling capacitor C2, the coupling capacitor C4, the pair of coupling capacitors already considered, C6 and C7, and the primary inductance of the output transformer. Thus the main feedback loop has four reactance stages that contribute to low-frequency rolloff. This means we can use the limit chart of Fig. 4 to determine the ratio of rolloff frequencies to be used (Figs. 3 and 5 are similar charts for three and five reactance stages, respectively). These charts give the ratio by which one cutoff frequency should be nearer the pass band of the amplifier than the remaining ones, in order to determine the criterion of stability and also the point at which peaking begins to occur.
Fig. 4. Limit chart for feedback loops in which four reactances contribute to the rolloff at one end of the response.
Fig. 5. Limit chart for feedback loops in which five reactances contribute to the rolloff at one end of the response. If we can make one of the RC networks have a rolloff frequency about 50 times higher than the remaining three, we shall almost avoid peaking completely, and have a very good stability margin. As we have already made the output end of the amplifier look like an arrangement with a rolloff at 4 Hz, we can proceed to make the rest of the amplifier look like this and arrange for one capacitor to roll off at 200 Hz. The primary inductance of the output transformer should not show a loss of more than 3 dB at 4 Hz at low levels, if it is not to distort at 20 Hz, because pentode tubes run into distortion quite quickly with elliptical loads. If a high- quality output transformer is being used to avoid this distortion, the inductance of the transformer should be satisfactory. It remains to set the rolloff provided by C4 at 4 Hz also; a value of .08 µF will provide a slight margin for error in tolerance. Finally, we utilize C2 to provide the earlier rolloff at 200 Hz. C2 should then be .0015 µF which gives a reactance of 520k at 200 Hz, again allowing a slight margin for tolerance error. Does not this mean the entire amplifier will now roll off at 200 Hz? The feedback provided is 20 dB, so this will extend the rolloff downwards, by a factor of 10:1, to 20 Hz. The rolloff at 20 Hz will be considerably sharpened by the fact that it is not a single reactance rolloff, but that by now the other three reactances around the loop are contributing. It is a good feature to have a sharp rolloff below 20 Hz to filter out rumble and other undesirable effects. The 12AX7 stage will give an output of 32 volts peak successfully. The signal handled by the first tube section is normally only 52 x 4 µF peak, a little more than 200 µF. When the feedback disappears, because of the reactance of C2 at 20 Hz, the voltage swing at the plate of the first half of the 12AX7 will rise to about 10 times this value, or a little over 2 volts, which is still well within the voltage-handling margin of the tube. We can see now why C2 is the best place to put the smaller coupling capacitor. If C4 were used for this extra rolloff purpose, the signal amplitude at the plate of the second half of the 12AX7 would also be multiplied by 10 times at the bottom end of the frequency band, and there is not enough margin to allow for this. The signal there is already 11 volts peak; 10 times this would raise the signal to 110 volts peak, which the 12AX7 should certainly not be expected to deliver.
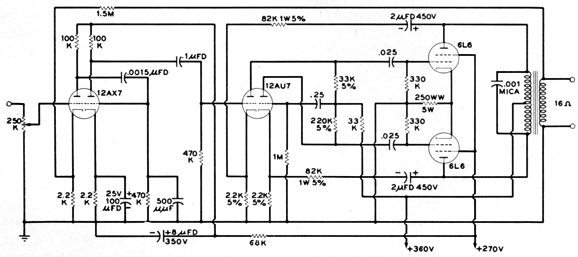
High-Frequency Response, Applying the same reasoning to the high-frequency rolloff, there are four high-impedance points that will be shunted by different capacitance values: the first and second plates of the 12AX7, each plate of the 12AU7, which is in push-pull, and the plates of the 6L6's, also in push-pull. The effective rolloffs of the last two have been modified by the inner-loop feedback arrangement so that both are effectively at 190 kHz. The plate resistance of the 12AX7 is quoted at 62.5k, but for a higher operating level than is used here. An estimate of 100k should be safe for this condition. The total capacitance in the grid circuit of the first 12AU7, with 14 dB feedback effective, should not be more than about 10 pF , which has a reactance of 100k at about 160 kHz. This is reasonably consistent with the pattern so far. Applying the same method as that used at the low-frequency end, the plate circuit of the first half of the 12AX7 should have a rolloff at about 1/50th of 160 kHz (taking the lower figure ), or 3.2 kHz. A capacitor to give a reactance of 100k at 3.2 kHz is 500 pF ; this we put across the second- stage grid resistor. With 20 dB feedback the rolloff frequency will be pushed out to around 32 kHz. Fig. 6. The complete amplifier circuit, with circuit values and voltages shown. We now have an amplifier with a response sensibly flat from 20 Hz to beyond 20 kHz, and with a total of 34 dB feedback in the two loops, which is fully effective from 200 Hz to 3,200 Hz. Beyond these frequencies' the amount of feedback available rolls off slightly, but there is still not less than 14 dB feedback over the output stage to the extreme limits of the band. As we have taken careful steps to see that the distortion in the absence of feedback is at a minimum, the amplifier should give very good performance.
Power Supply Components The only components we now have left to specify are those in the power supply. R6 and C3 must reduce a supply voltage of 270 (the same as that for the output tube screen grids) and provide some decoupling. The B+ voltage we need for the 12AX7 tube is 180 volts, so we can allow a 90-volt drop in R6 at a total current drain of 1.2 mA (0.6 mA for each tube section). R6 is accordingly set at 75k. In practice 68k will serve, because the voltage here is not critical. C3 can be 8 µF, 350 volts working; this will give a reactance of less than 20k down to 1 Hz, and hence cannot interfere with the rolloff frequencies we have just calculated. The cathode bypass capacitor C1, which is across 2.2k, should be not less than 100 µF, 25 volts working. This will give a reactance of less than 1,600 ohms down to a frequency of 1 Hz. For the B+ supply we need a maximum of 360 volts at a total current drain of about 125 mA. This can be provided by a power transformer with a 350-0-350 Vac secondary winding, a 5U4 rectifier, and a capacitor-choke-capacitor filter, the design of which has been dealt with elsewhere in this magazine.* This article has discussed the complete design of a feedback amplifier, and has introduced all the factors to be considered, as painlessly as possible. From this it will be seen that, taken step by step, there is nothing very difficult about the design of such an amplifier. In the next article of this series, we shall take a step further and consider special kinds of output arrangements and the design factors involved in getting the best out of these circuits.
*Marshall, Joseph. "Practical Audio Design", AUDIOCRAFT, Jan., Feb., Mar., 1956.
Music Recommendation: Elinor Frey
I then listened the following three other albums by Frey.
All were worth hearing and re-hearing. //JRB
Answer to topology quiz:
User Guides for GlassWare Software
For those of you who still have old computers running Windows XP (32-bit) or any other Windows 32-bit OS, I have setup the download availability of my old old standards: Tube CAD, SE Amp CAD, and Audio Gadgets. The downloads are at the GlassWare-Yahoo store and the price is only $9.95 for each program. http://glass-ware.stores.yahoo.net/adsoffromgla.html So many have asked that I had to do it. WARNING: THESE THREE PROGRAMS WILL NOT RUN UNDER VISTA 64-Bit or WINDOWS 7 & 8 or any other 64-bit OS. I do plan on remaking all of these programs into 64-bit versions, but it will be a huge ordeal, as programming requires vast chunks of noise-free time, something very rare with children running about. Ideally, I would love to come out with versions that run on iPads and Android-OS tablets.
//JRB
|
|
I know that some readers wish to avoid Patreon, so here is a PayPal button instead. Thanks. John Broskie John Gives
Special Thanks to the Special 86
I am truly stunned and appreciative of their support. In addition I want to thank the following patrons:
All of your support makes a big difference. I would love to arrive at the point where creating my posts was my top priority of the day, not something that I have to steal time from other obligations to do. The more support I get, the higher up these posts move up in deserving attention. If you have been reading my posts, you know that my lifetime goal is reaching post number one thousand. I have 484 more to go. My second goal was to gather 1,000 patrons. Well, that no longer seems possible to me, so I will shoot for a mighty 100 instead. Thus, I have 14 patrons to go. Help me get there.
Only $12.95 TCJ My-Stock DB
Version 2 Improvements *User definable Download for www.glass-ware.com |
|||||||||||||||||||||||||||||
| www.tubecad.com Copyright © 1999-2020 GlassWare All Rights Reserved |

